
How To Set Up HTTP Proxies On MacOs Browsers
Here you have a step by step guide with screenshots to guide you through the required proxy configuration on each browser.
To use the proxies you purchased you need to configure the browser of your choice accordingly. Here you have a step by step guide with screenshots to guide you through the required configuration on each browser.
Get your proxy IP and port
First, log in to your account and go to your purchased HTTP proxies.

Get the IP and Port of the proxy server you want to use. These are the credentials you'll be adding in the browser's proxy settings.

Choose your authentication method
To connect to the proxy server, you need to choose one of the two authentication methods: By using a username and password or through IP Authentication.
On the right column you can see the Proxy Credentials tab used for the user password authentication and the Authentication IPs tab used for the IP authentication.

- Username & password authentication
If you choose to authenticate by using a username and password, you'll be asked to provide the credentials after you configure the browser to use the proxy server. A pop up window will open when you'll access a web page (you'll find a screenshot of this request in the following guides for each browser).
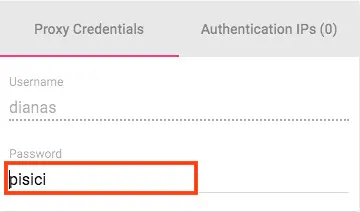
You can find the username and password in your account under the Proxy Credentials tab.

The username is your account's username and it can't be changed. You can change the password by clicking on the passoword's field and typing in the desired password. The change will take place automatically.
*This password is different from the password you use to log into your account.
- IP authentication
Through this method, the authentication to the proxy server will be made based on your IP without it requesting a user password.
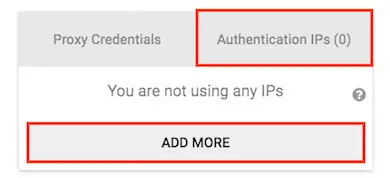
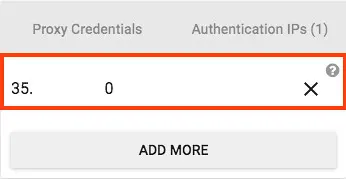
To add your own IP to IP manager access the Authentication IPs tab and click on Add More.
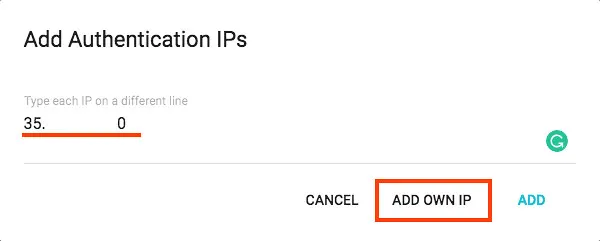
A new window will pop up. Click on Add own IP and your IP will be pulled automatically.
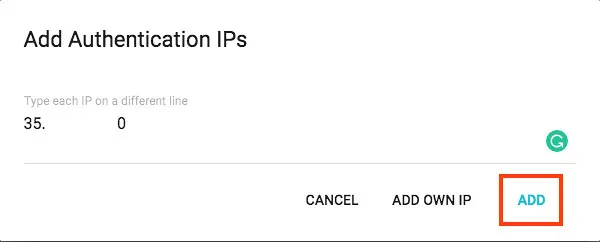
To save it, click on Add.
The IP will be shown in your account in the Authentication IPs tab. You can delete the IP by clicking on the Xnext to it.
Safari
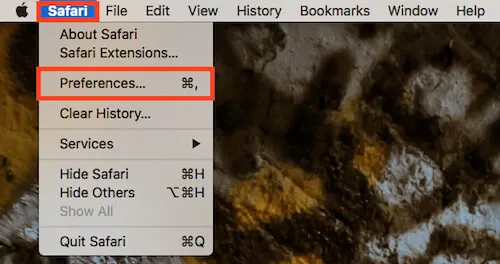
To configure the proxy in Safari, open up the browser and go to Preferences by clicking Safari in the menu bar. Or you can use the "Command" keyboard shortcut.
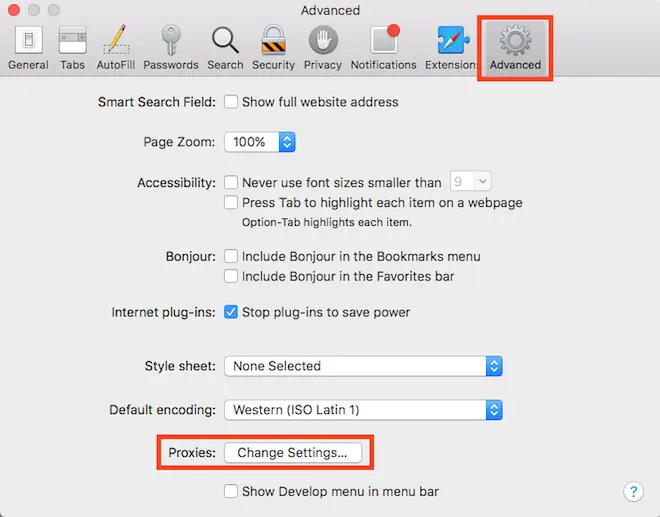
A window with the browser's settings will pop up. Go to the Advanced tab. At the bottom of the page, you'll see the option Proxies. Click on Change Settings...
Safari pulls its network preferences from the OS's settings so a screen with the advanced network configuration will pop up.
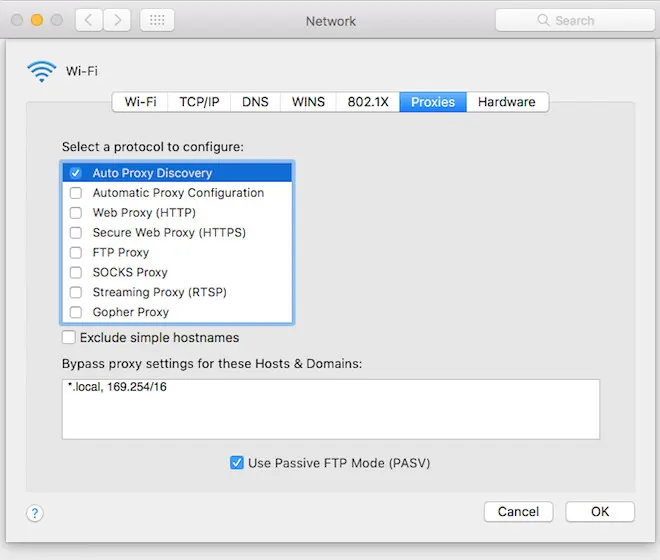
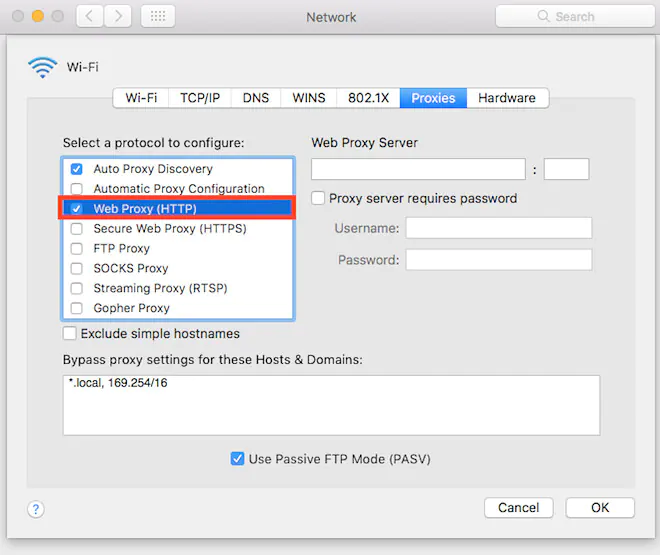
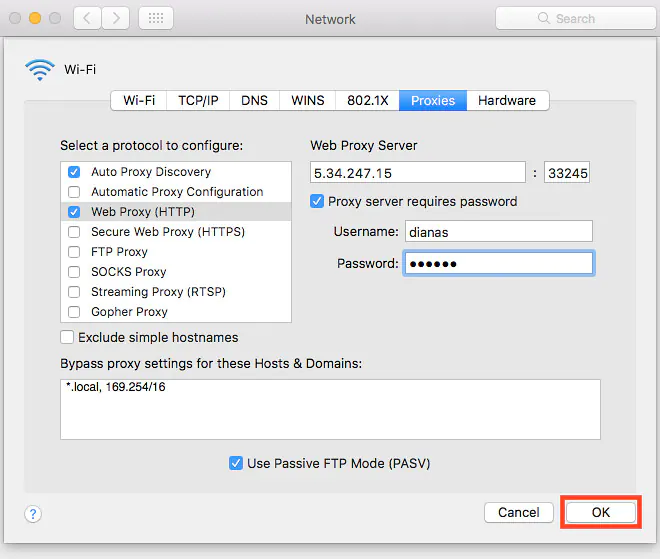
Check the Web Proxy (HTTP) box and it will show you some fields on the right where you can add the proxy credentials.
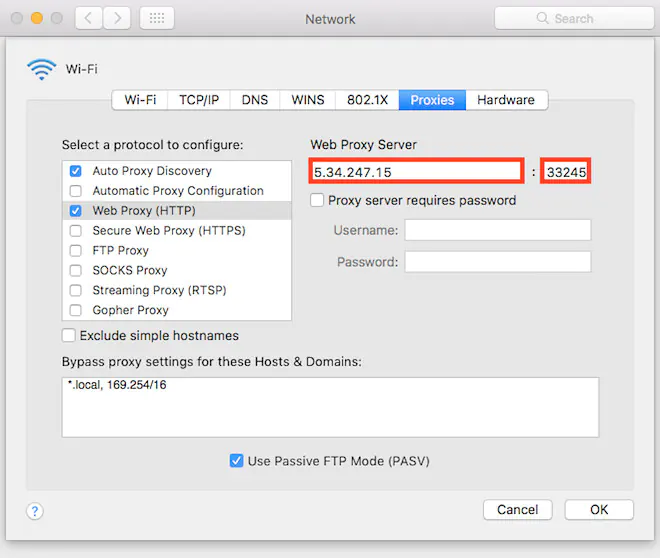
Fill in your proxy IP and port in the Web Proxy Server field.
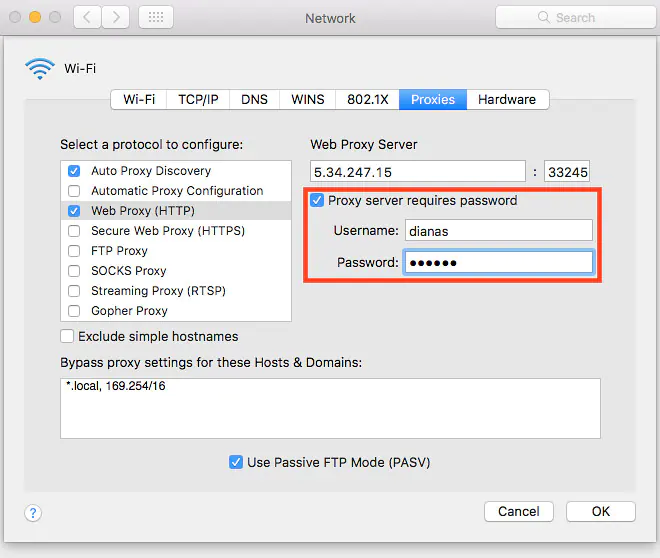
Enable Proxy server requires password and fill in the username and password you got from your account.
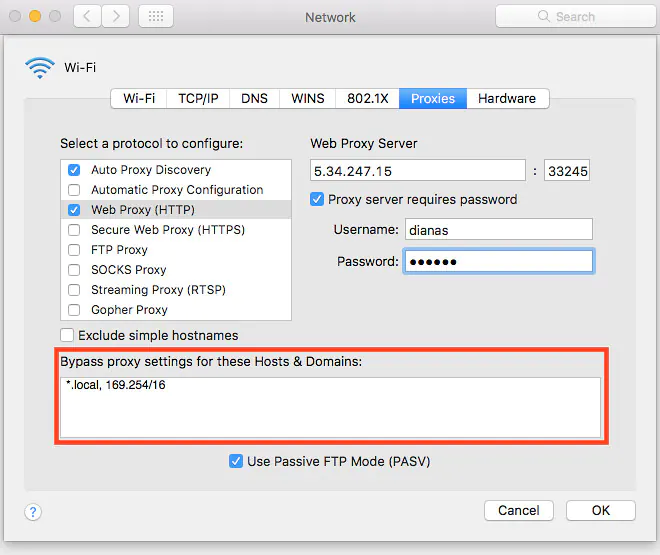
If you have websites you don't want to use the proxy servers on, you can add them in the Bypass proxy settings field (as shown below). By default, your local networks won't be accessed through proxies. You can change this by deleting the domains from the field.
Once you're done with filling all the fields, click OK.
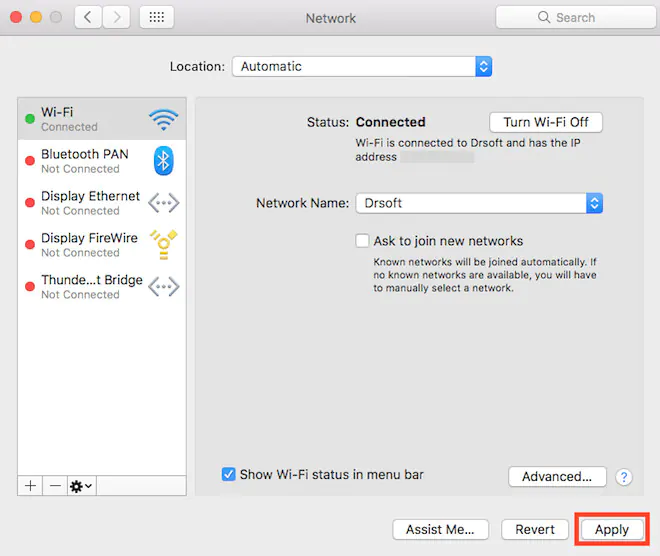
You'll be taken to the main Network settings window. Click Apply for the changes to take place.
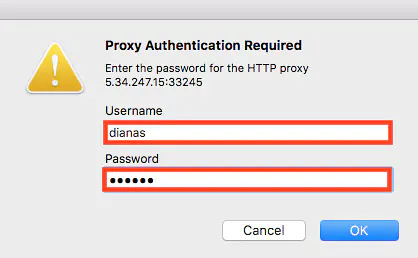
You'll be asked to provide the username and password to authenticate to the proxy server when you'll access a web page. Fill in the Proxy Credetials from your account.
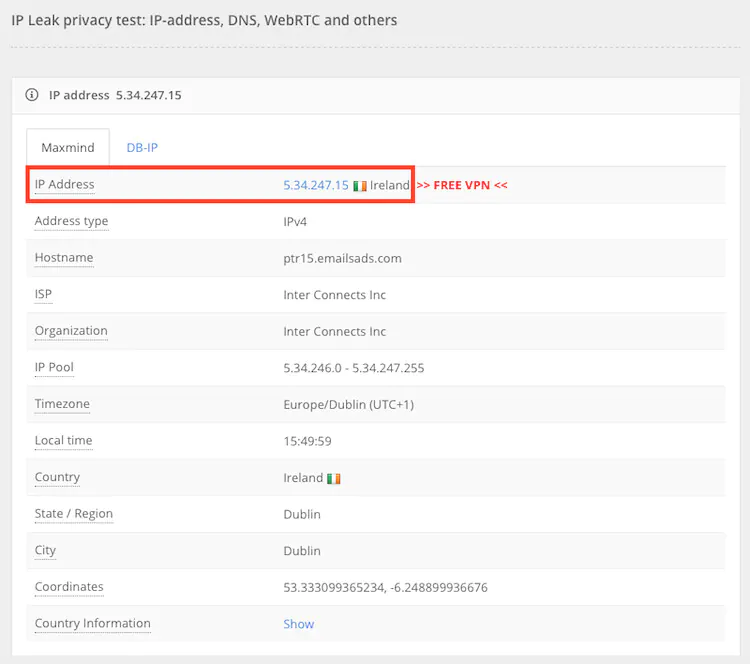
To see if the browser runs on the proxy service, go to MyIp and it'll show you which IP is being used.
*Mind that if you change the settings for Safari and you also have Google Chrome, the change will take place on all browsers.
Google Chrome
To configure the proxy in Google Chrome, you first need to enter the Settings by clicking on the drop-down menu in the upper right corner.
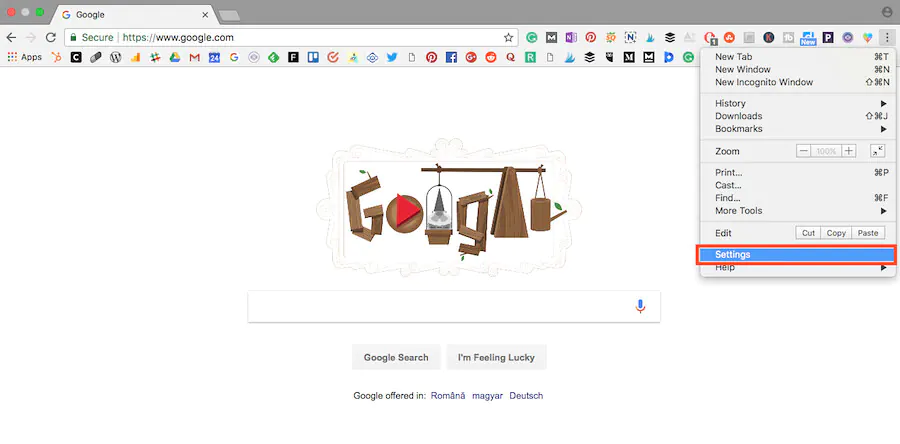
Scroll down until you see Advanced and click on it to see more options.

Scroll to the bottom of the page where you'll find Open proxy settings.

After you click to open the proxy settings, a window with your advanced network connections settings will pop-up. Chrome gets its network preferences from the system's settings so here's where you're going to customize your proxy server.

Check the Web Proxy (HTTP) field.

New options will appear on the right. Here is where you add your proxy address and port number.

Check the box next to Proxy server requires password and fill in the username and password (the Proxy Credentials from your account).

By default, local networks won't be accessed through proxy servers. If you want to change this, delete the inputs in the Bypass proxy settings. Also, if you have certain websites where you don't want to use proxies, add them in the field separated by commas.

Once you added all the credentials, click OK.

You'll be taken to the main network settings window where you have to click Apply to finish the proxy configuration in Chrome.

When you'll access a web page, you'll be asked to fill in the username and password so you authenticate to the proxy server (The Proxy Credentials from your account).

To see if the changes successfully took place, go to MyIp and it will show you the IP you're connected with.

*Mind that if you change the settings for Google Chrome and you also have Safari, the change will take place on all browsers.
Mozilla Firefox
To configure the proxies in Mozilla Firefox first open up the browser and click on Preferences from the drop-down menu in the upper right corner.
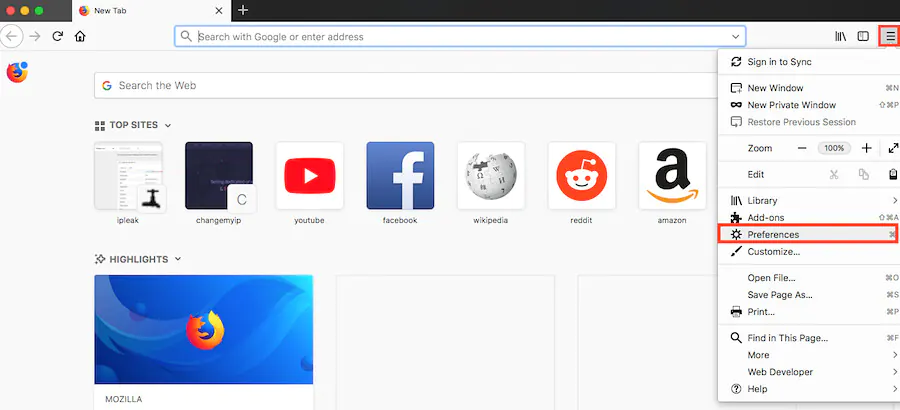
Scroll down to the bottom of the page where you'll find Network Proxy. Click on Settings.
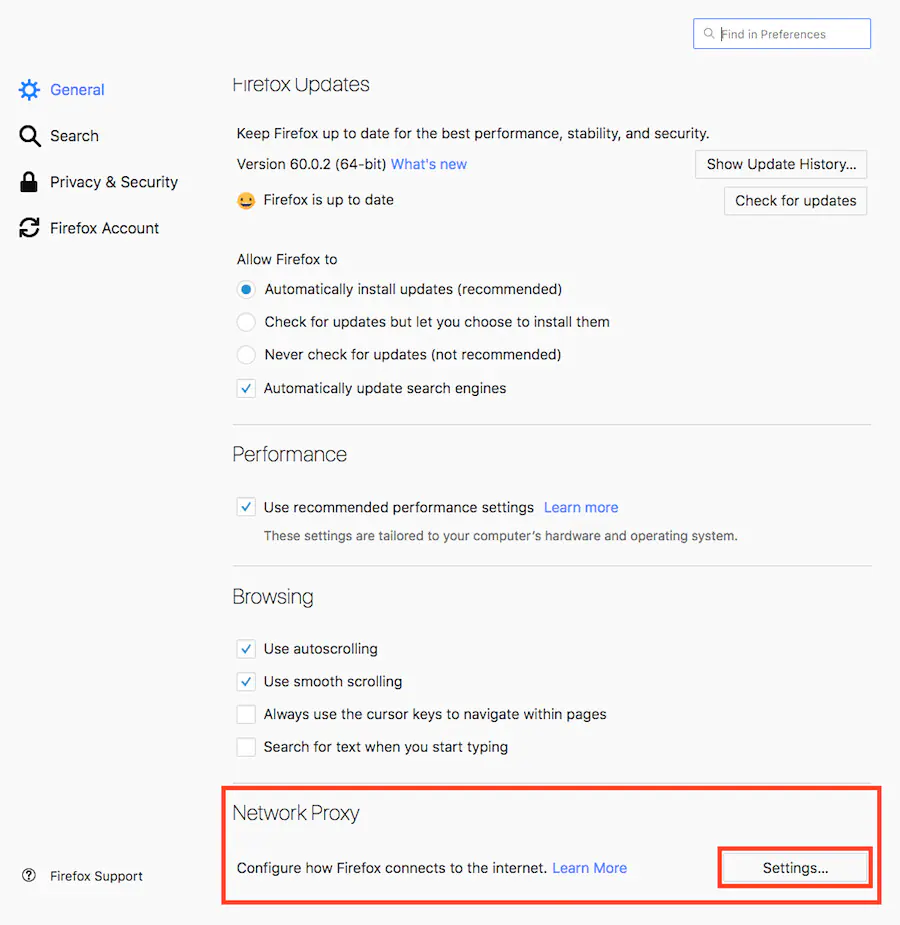
A new window with the proxy settings will open.
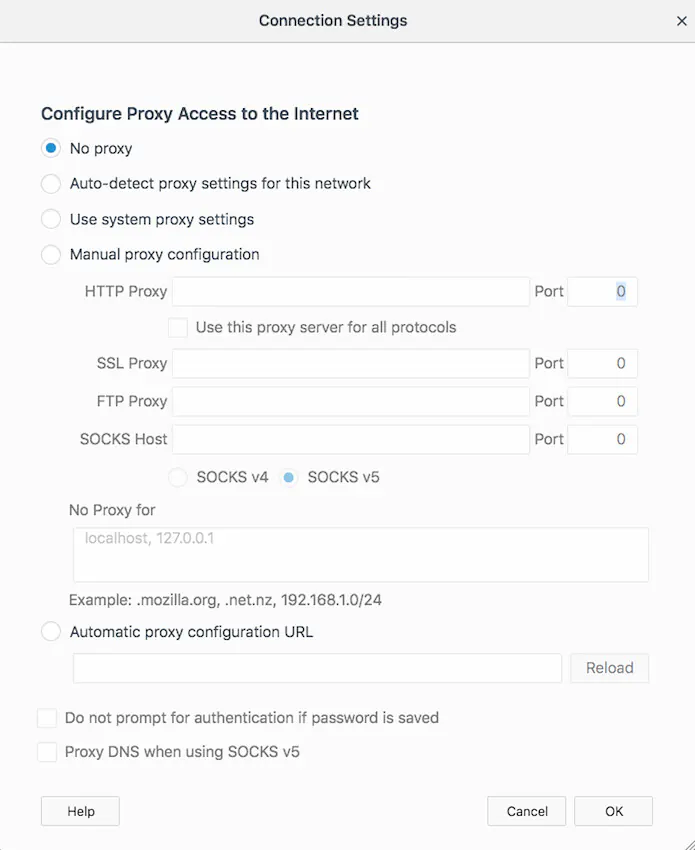
Click on the radio button next to Manual proxy configuration and add your proxy address and port in the HTTP Proxy field.
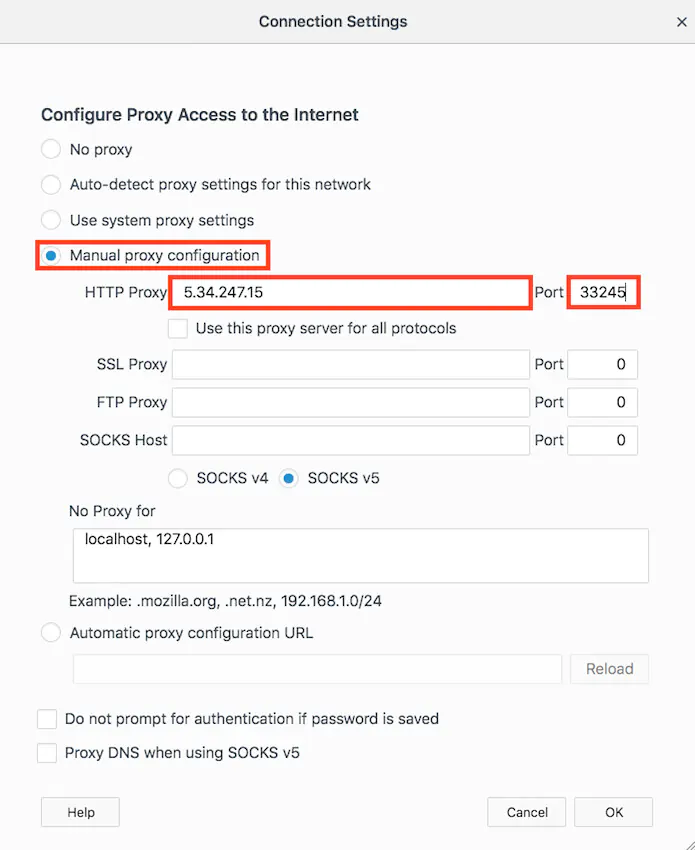
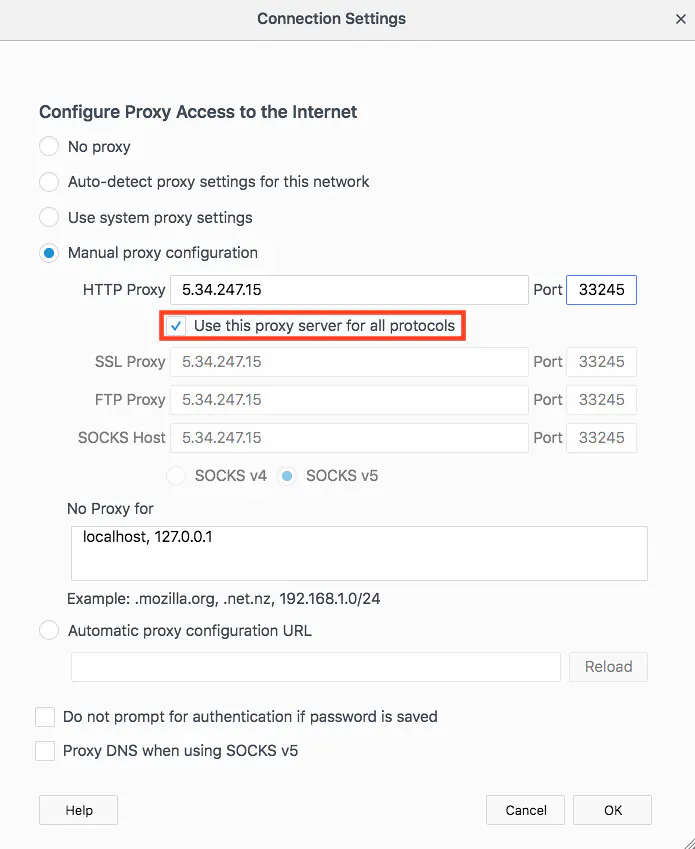
Enable Use this proxy server for all protocols. You'll see that all the fields bellow will fill in automatically.
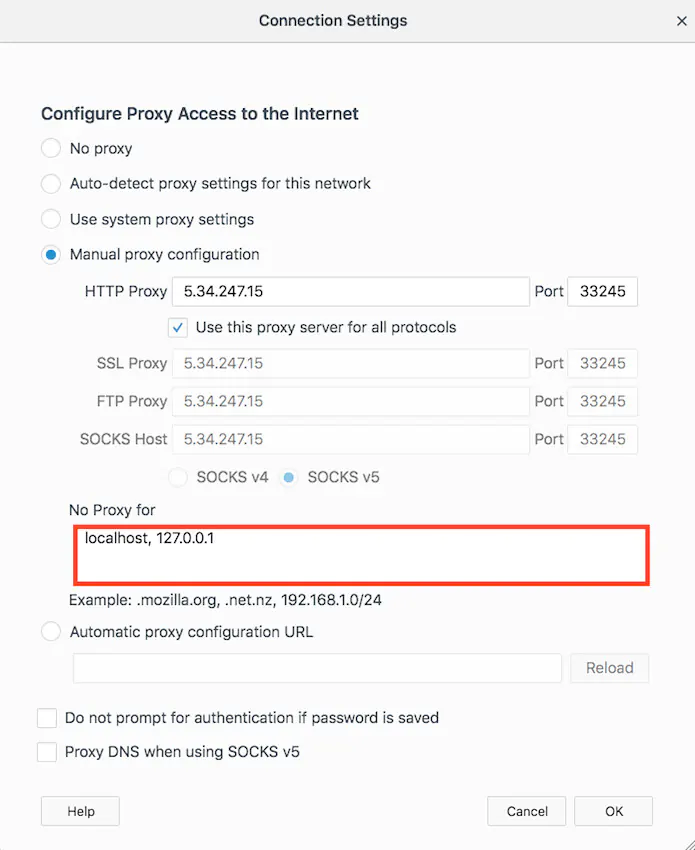
You can add which websites not to use the proxy servers in the No Proxy for field. By default, it's configured not to use proxy servers on local networks. If you want to add more options, paste the addresses in the field separated by commas.
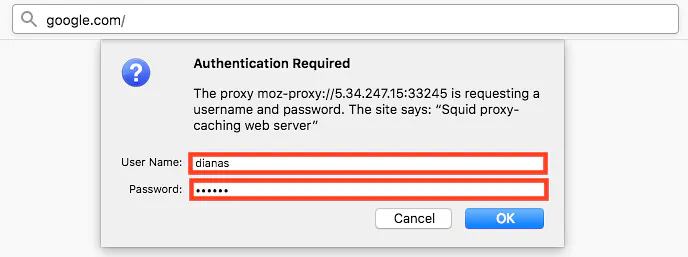
Once you're done filling the fields, click OK. When you'll access a web page, you'll be asked to provide the username and password to authenticate to the proxy server (the Proxy Credentials you take from your account).
Head over to My Ip to see if the IP matches your proxy server.


Buy Proxy, SOCKS5 & ShadowSocks Now
Buy Proxy now HTTP Proxies or SOCKS5, Dedicated or Shared, Residential or Datacenter. Fully Anonymous and Premium.
Buy Proxy

What Can We Offer You?
We offer a unique proxy infrastructure, monitored 24/7 with a 99% uptime. In the rare event of a failure, we take immediate action to resolve the issue.
Fast HTTP Proxies and SOCKS5
Our proxy servers are optimized for performance, powered by a 1Gb/s network. Whether you use our residential or datacenter proxies, you'll experience seamless performance.
Proxies with Unlimited Bandwidth
Our Dedicated, Shared, Residential Proxy, SOCKS5, Shadowsocks, and VPNs offer unlimited bandwidth, allowing you to use them as much as you need without any concerns.
Instant Activation Proxies: Plug & Play
Purchase proxies with Instant Activation using a Card or PayPal. Transactions with cryptocurrencies require network confirmations.
Multiple Payment Methods: From Card to Crypto
Buy proxies with Card, PayPal, Bitcoin (BTC), Bitcoin Cash (BCH), Ethereum (ETH), Litecoin (LTC), Solana (SOL), Monero (XMR), Polygon(POL), Tron (TRX), AVAX, USDT, USDC, DAI, DASH, DOGE, TON.
Choose Your Proxy by Country, State, or City
Select proxies by city, state, or country. Our static IP proxies, VPNs, residential or datacenter, can be filtered by your desired location. Residential proxies can also be filtered by ISP.
Dual Authentication
Opt for username and password authentication, or authenticate by adding your IP address to our system. Access your proxy password or add your IP in your account.
Monthly IP Address Refresh
We offer monthly proxies, both residential and datacenter. For long-term purchases, we provide the option to change proxies directly in your account.
Proxies Focused on Top Privacy & Security
Our static proxies and VPNs (residential or datacenter) ensure 100% anonymity without any IP or DNS leaks. We maintain a no-logs policy.
Affordable Prices, High-Quality Proxies
Our Residential and Datacenter Proxies are competitively priced, ensuring affordability without compromising on quality.
Diverse Proxy Services and VPNs
As a leading proxy provider, we offer 13 services, including Residential and Datacenter Proxies, SOCKS5, Shadowsock, and VPNs, available in static or rotating options.
16/7/365 Technical Support
We understand the importance of support. If you have questions about our services, contact us via Live Chat. For any issues, open a support ticket in your account.
User-Friendly Settings
Our dashboard is easy to use and intuitive. We constantly seek ways to enhance user experience. If you need assistance, contact us and we'll gladly help!
Our Services
We offer a variety of static and dynamic IP solutions designed for legitimate business and technical use, with global coverage tailored to your project requirements.
High quality & private proxies
Dream no more! Get acquainted with our products today: protected proxy-servers, at incredible speed and minimum cost from you. Still not convinced? Check our proxies features out: - work with any sites/programs - supports HTTP/HTTPS, SOCKS5, ShadowSocks, Trojan protocols - simple login: your proxy password or by your IP
With our proxies you get fast, stable and most important, an anonymous tool to get by on the internet. High quality proxies is our motto. Try our products today: spare 5 minutes from your time to gain continuos work-flow.
Buy Proxy


